
Stitch Length & Width
Let's learn about stitch length and stitch width! I'll give you some basics followed by some information to make your sewing brain bigger.
 |
| Some stitch options on a sewing machine. |
First off, let me tell you the basic and most commonly used settings for straight and zigzag stitches on your sewing machine:
•A straight stitch has length but not width. Standard settings are
Stitch Length 2.5 and Stitch Width 0*.
•A zigzag stitch has length and width. The settings for a zigzag are based on how wide and how open/closed you want it; the middle range for a zigzag stitch is
Stitch Length 2.5 and Stitch Width 3 or 4.
Decorative stitches also have both length and width. Specific settings for decorative stitches are listed in your owner's manual but sometimes can benefit from a little tweaking to make the stitch prettier.
*Read your owner's manual for direction on where to set the Stitch Width dial for your machine when sewing a straight stitch. Common sense tells us that "0" is the correct setting but sometimes it shifts the needle to the left/right and throws off the seam allowance measurement. The stitch width dial on my Janome Sewist centers the needle when set at "5".
- - - - - - - - - - - - - - - - - - - - - - - - - - - - - - - - - - - - - - - - - - - - - - - - - - - - -
STITCH LENGTH
On your sewing machine look for the dial with the illustration that looks like a dashed line. It starts off with a small dash and then the dashes gradually get bigger.
 |
| Example of a Stitch Length Dial |
The typical range is 0 to 4mm but can go up to 5 or 6, depending on your sewing machine. The average stitch length is 2.5mm. This is the typical setting on newer sewing machines. Older machines usually give you a range of about 4 to 60 which tells you how many stitches per inch; the equivalent of 2.5mm is about 10-12 stitches per inch.
 |
| Comparing Stitch Lengths for Straight Stitches |
The smaller the stitch length number, the smaller the stitch. If you want to reinforce a seam, are sewing with sheer fabric, or need strong stitches, then use a smaller stitch length. Beware, small stitches are not fun to rip out and can tear your fabric! A longer stitch length is typically used for basting (temporary stitches), sewing with heavyweight fabric, or for defining a topstitch.
STITCH WIDTH
For the stitch width, look for the dial with mountains and peaks that start off flat and gradually grow taller.
 |
| Example of a Stitch Width Dial |
The range is typically from size 0 to 5mm on most sewing machines but can be wider. The stitch width determines how far the stitch will go from side to side. Below are stitch width comparisons for zigzag stitches (the stitch length was set at 2.5mm). Notice that when set to 0mm the stitch is straight.
 |
| Comparing Stitch Widths for Zigzag Stitches |
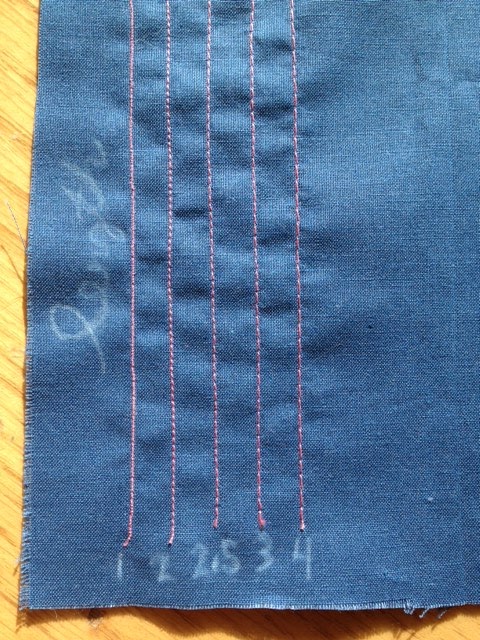
The stitch length works together with the stitch width and determines how open or closed the zigzag/decorative stitch will be. I like to suggest you imagine an accordion when you're setting the stitch length for a zigzag--the more open the accordion, the more open the zigzag stitch which means a larger setting number is used for the stitch length. To make a zigzag that is very close (a satin stitch), set the stitch length to .5 or slightly smaller. Below are stitch length comparisons for zigzag stitches (the stitch width was set at 4mm). When set to 0mm the zigzag sews in place, it doesn't move.
 | |
|
A standard zigzag stitch can be adjusted for your particular needs but a decorative stitch has suggested settings to make it look and hold best. The owner's manual for your sewing machine will tell you the suggested settings and will also tell you which presser foot to use.
TIP: The stitch width dial moves the needle left and right. If you ever have a need to shift the needle just a tad to complete a nice looking seam, use the stitch width dial to move the needle.
NOTE: Always use the correct presser foot when sewing a zigzag/decorative stitch to avoid breaking the needle! The zigzag presser foot has an oval cut out so that the needle can move side-to-side. It can also be called the all-purpose presser foot.
Here are some ways to use a zigzag:
-seams on knit fabric
-finishing seam allowances
-reinforcing particular seams (e.g. the crotch area of pants)
-applique
-to add interest to your project
- - - - - - - - - - - - - - - - - - - - - - - - - - - - - - - - - - - - - - - - - - - - - - - - - - - - -
Now that you know about stitch length and stitch width, go try them out on your machine and make some samples comparing the stitches. It's fun to see how these dials work together plus it will give you a good understanding of how your machine sews.

This was so helpful and clear to understand! Thanks!
ReplyDeleteHi Nikia,
DeleteThank you! I'm glad you found it helpful!
What are you sewing?
So far, the only things looking OK are some Barbie size bean bag chairs. The goal is to make doll clothes for the massive doll collection that I share with my daughter. I have a really old Singer machine (without a manual) and zero experience (other than hand sewing). After Googling bobbin preparation and threading the machine, I was zooming along (on slow!). As I looked at online tutorials on how to make different things I realized I had no idea how to shift the stitching. I did know how to change the options, but I did not understand how stitch pattern, length and width all came together. I got that from reading your blog entry. I used some fabric scraps to practice the different variations that you showed on your page and again I am office to the races (still on slow!). I want to figure out tension next. I am one of those cerebral people who need to understand mechanics (or underlying processes) to move things into practice. Thanks!
DeleteHow fun that you have a doll collection with your daughter! There's nothing wrong with going slow! It keeps you focused an accurate too. :)
DeleteTension isn't very complicated. The best tip I can give you is to make sure you thread the machine properly, wind a nice bobbin (tight and even), and place the bobbin in the machine in the correct direction (this step is key!).
Hope you've been making some fun things!
I'm new to sewing and this illustration was very helpful, and now I understand why using the correct presser foot is important (lol). I just received my new Janome 6300 and I'm excited to try it out.
ReplyDeleteThank you for sharing!
You're welcome! Glad this post was helpful. How's your new Janome? What have you made?
DeleteGreat work
ReplyDeleteVery clear and precise
Love it! Thanks:)