Showing posts with label behind the seams. Show all posts

Wednesday, November 21, 2012

The Long & Short of It (Stitch Length & Width)

BehindTheSeamsBadgeWithBandandWords3
BEHIND THE SEAMS
Stitch Length & Width


Let's learn about stitch length and stitch width! I'll give you some basics followed by some information to make your sewing brain bigger.
Some stitch options on a sewing machine.

First off, let me tell you the basic and most commonly used settings for straight and zigzag stitches on your sewing machine:

•A straight stitch has length but not width. Standard settings are
Stitch Length 2.5 and Stitch Width 0*.

•A zigzag stitch has length and width. The settings for a zigzag are based on how wide and how open/closed you want it; the middle range for a zigzag stitch is
Stitch Length 2.5 and Stitch Width 3 or 4.
Decorative stitches also have both length and width. Specific settings for decorative stitches are listed in your owner's manual but sometimes can benefit from a little tweaking to make the stitch prettier.

*Read your owner's manual for direction on where to set the Stitch Width dial for your machine when sewing a straight stitch. Common sense tells us that "0" is the correct setting but sometimes it shifts the needle to the left/right and throws off the seam allowance measurement. The stitch width dial on my Janome Sewist centers the needle when set at "5".

- - - - - - - - - - - - - - - - - - - - - - - - - - - - - - - - - - - - - - - - - - - - - - - - - - - - -

STITCH LENGTH
On your sewing machine look for the dial with the illustration that looks like a dashed line. It starts off with a small dash and then the dashes gradually get bigger.

Example of a Stitch Length Dial

The typical range is 0 to 4mm but can go up to 5 or 6, depending on your sewing machine. The average stitch length is 2.5mm. This is the typical setting on newer sewing machines. Older machines usually give you a range of about 4 to 60 which tells you how many stitches per inch; the equivalent of 2.5mm is about 10-12 stitches per inch.
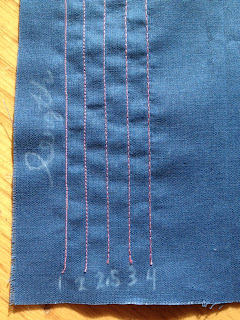
Comparing Stitch Lengths for Straight Stitches

The smaller the stitch length number, the smaller the stitch. If you want to reinforce a seam, are sewing with sheer fabric, or need strong stitches, then use a smaller stitch length. Beware, small stitches are not fun to rip out and can tear your fabric! A longer stitch length is typically used for basting (temporary stitches), sewing with heavyweight fabric, or for defining a topstitch.


STITCH WIDTH
For the stitch width, look for the dial with mountains and peaks that start off flat and gradually grow taller.

Example of a Stitch Width Dial

The range is typically from size 0 to 5mm on most sewing machines but can be wider. The stitch width determines how far the stitch will go from side to side. Below are stitch width comparisons for zigzag stitches (the stitch length was set at 2.5mm). Notice that when set to 0mm the stitch is straight.

Comparing Stitch Widths for Zigzag Stitches

The stitch length works together with the stitch width and determines how open or closed the zigzag/decorative stitch will be. I like to suggest you imagine an accordion when you're setting the stitch length for a zigzag--the more open the accordion, the more open the zigzag stitch which means a larger setting number is used for the stitch length. To make a zigzag that is very close (a satin stitch), set the stitch length to .5 or slightly smaller. Below are stitch length comparisons for zigzag stitches (the stitch width was set at 4mm). When set to 0mm the zigzag sews in place, it doesn't move.

Comparing Stitch Lengths for Zigzag Stitches

A standard zigzag stitch can be adjusted for your particular needs but a decorative stitch has suggested settings to make it look and hold best. The owner's manual for your sewing machine will tell you the suggested settings and will also tell you which presser foot to use.

TIP: The stitch width dial moves the needle left and right. If you ever have a need to shift the needle just a tad to complete a nice looking seam, use the stitch width dial to move the needle.

NOTE: Always use the correct presser foot when sewing a zigzag/decorative stitch to avoid breaking the needle! The zigzag presser foot has an oval cut out so that the needle can move side-to-side. It can also be called the all-purpose presser foot.

Here are some ways to use a zigzag:
-seams on knit fabric
-finishing seam allowances
-reinforcing particular seams (e.g. the crotch area of pants)
-applique
-to add interest to your project

- - - - - - - - - - - - - - - - - - - - - - - - - - - - - - - - - - - - - - - - - - - - - - - - - - - - -

Now that you know about stitch length and stitch width, go try them out on your machine and make some samples comparing the stitches. It's fun to see how these dials work together plus it will give you a good understanding of how your machine sews.


Friday, October 12, 2012

Let's Start with Sewing Machines

BehindTheSeamsBadgeWithBandandWords3
BEHIND THE SEAMS
Sewing Machines
People often ask me which sewing machine I suggest they buy; that is a hard question to answer because there isn't one right answer. There are many things to think about but to keep it simple, I believe that as long as a sewing machine sews nice stitches, then you have a good sewing machine! You may not find that a very helpful answer, so here's more to think about. . .

For starters, ask yourself two questions:
1-What do I plan on sewing?
2-How often do I plan on using a sewing machine?

Once you've answered those two questions, then you can make a better decision about the type of machine you should buy and how much you should spend. Your choices come down to two types of machines, MECHANICAL and COMPUTERIZED, but within those two choices you will find a whole range of other choices, e.g. price; bells and whistles; plastic parts vs. metal parts; dealer vs. chain store vs. used.

Below I have listed some basic information to think about when shopping for a sewing machine. (I think you will also find this information helpful if you already own a sewing machine.) There are four specific sections:
-an inexpensive machine
-a mechanical machine
-a computerized machine (may also be referred to as an electronic machine)
-a vintage machine.

DISCLAIMER: These are my personal opinions and not meant to be absolute truths about sewing machines.


-an INEXPENSIVE machine (most are mechanical; some are computerized/electronic):
This machine will be priced roughly between $75 and $150. You can find it at a big box store or a chain sewing/craft store. It has basic options and comes with a nice variety of accessories and tools but the key internal parts are made of plastic. If those parts break or crack, the repair will cost you as much as you payed for the machine, if not more; these machines are often considered to be "disposable" machines.

If you plan on being an occasional sewer sewing basic projects or working on mending and alterations, then this is the machine for you. It is not a big investment, but it will get the basics done. If you begin to do more sewing, then you will find that you will want to upgrade to a more quality sewing machine.

I purchased a few inexpensive sewing machines when I first began doing sewing instruction and they're still hanging in there after 7 years (pictured above). I still use them if I need extra machines when I teach and they still sew a nice seam. Every once in a while, the plastic bobbin hook gives me trouble but usually works right again if I take apart the bobbin area and clean it out.


-a MECHANICAL machine:
The mechanical machine has dials and knobs that you turn by hand to select the stitch, the stitch length, and the stitch width. It is a basic machine but can do a fine sewing job. It can sew straight stitches, zigzag stitches, and decorative stitches. It can make buttonholes and comes with a variety of presser feet and tools to help you get your sewing job done well! A mechanical machine can be used to make garments, quilts, home decor, and crafty projects too.

I distinguish the quality of a mechanical machine not so much by price but by plastic vs. metal parts. In my opinion, a mechanical sewing machine with a plastic bobbin hook is a low-end machine ($75-$150). These are the sewing machines you can buy at a big box store or a chain sewing/craft store. A sewing machine with a metal bobbin hook is a better quality machine ($200-$600) and can be found at a sewing machine dealer. The difference between the two is that the plastic hook can crack/break and this will make your machine nonfunctional until it gets repaired.


-a COMPUTERIZED/ELECTRONIC machine:
This machine has a screen that displays information about the stitch you have selected. The information varies, but it can tell you about the stitch (length and width), the presser foot you should use, and other features specific to the model you buy. This machine adjusts itself automatically depending on the stitch you select but also allows you to adjust the settings to your particular needs. It is said to be more precise than a mechanical machine and can offer a wide variety of stitch selections.


To the right is an example of a computerized/electronic sewing machine. It is a kind of "hybrid" sewing machine because it is a combination of a mechanical and computerized machine. It has a digital display but you turn a knob to adjust some settings. This machine was given to me and so I don't know where it was purchased but my guess is that it's from a big box store or chain sewing/craft store. And just like with mechanical machines, computerized machines can be made with plastic or metal bobbin hooks.

A good computerized machine will usually be sold by a dealer and might even come with a free class or two. The price range is roughly between $300 and $1,500 or more. The price will go up as the machine offers more options and comes with more accessories. A computerized machine is good for someone who sews often and makes garments, quilts, home decor, and crafty projects too.

Which one should you buy? Mechanical vs. Computerized? I suggest that a beginner sewer test-drive a mechanical machine and a computerized machine to decide which one feels better. You might be able to tell a difference, or not, but you won't know until you try. One feature I really like on a computerized machine is the "needle up/needle down" option which means that once you come to a stop, your machine will lower the needle into the fabric automatically or it might give you the option to do this with the push of a button--this depends on the brand of the machine. Having said that, I've been very impressed with the quality of the mechanical sewing machines we use at Fancy Tiger Crafts. They've held up well considering the amount of people who use them AND I think they are sturdy enough to last for a long time. My best suggestion to you is to test-drive the choices.


-a VINTAGE machine:
Another type of machine that you might consider sewing with is an older machine that some might call "vintage". Do not underestimate the quality of an old machine! Sewing machines used to be made of all metal parts, including the body, and some can easily out-sew some of the newer models of machines. If you buy one of these from a yard sale, a thrift store, or are given one, make sure you are getting one that has been well-loved. Watch Sewing Machine 911 for help in giving it a good cleaning or take it to a repair shop to get it cleaned up and tuned and you should be all set to get started sewing. A vintage machine is a mechanical machine.


Notice that I'm not pushing any brand names. I do have a few brands that I really like, but it doesn't mean I won't sew with other brands. I want to stress that as long as you understand the descriptions above, then you should be fine buying any of the big name brands of machines for your sewing adventures. Beware of buying a machine that might be more than you are ready for as a beginner. Start simple and remember that you can always upgrade. Dealers usually offer a trade-in program within the first year or two after your purchase which allows you to put your initial investment into a better machine. Also, a dealer might be the perfect place to get a good used sewing machine. They often tune-up and clean trade-in machines and resell them.

Give yourself some time to find the machine that feels good for you. Test-drive a few and go to a few stores before you make a final decision. Once you pick your favorite, get it home and START SEWING!

Thursday, October 11, 2012

BEHIND THE SEAMS: Tips & Tricks for Sewing


I think you already know I like to sew. You probably also know that I'm a sewing instructor. Put the two together and imagine all the questions I get about sewing. . .

Most commonly I'm asked, "Did you make that?" I'm also often asked about tips and tricks that help make sewing projects quicker and easier to complete. So, while I don't make all (or even most) of the clothes for myself and my kids, I do have lots of sewing tips and tricks to share.

Over the next few months I'll be sharing those tips and tricks here at Dia's Days in a collection called "Behind the Seams" aka BTS! Whenever you see the badge above, you'll know I'll be sharing helpful information for sewing!

Friday, January 20, 2012

My Good Sewing Buddy, The Seam Ripper

If you've ever sewn something you probably would agree that a seam ripper quickly becomes your sewing companion. We all make mistakes when we sew, no matter how experienced we are. If you need to take out stitches, you better have a good seam ripper! I have a favorite and it's an easy one to find.

Here it is:

I really like this seam ripper because it rips stitches so smoothly and easily--the tip is thin and pointy and the curved blade is very sharp. You do have to be VERY CAREFUL with it, though, because it's so sharp that you can end up cutting a hole in your fabric.

Ripping out seams isn't very fun so use a good seam ripper and you might not mind it as much.

HOW TO USE A SEAM RIPPER
 It's not very hard to do but pay close attention to what you are doing so that you don't damage your fabric when ripping out stitches. When you find the stitch you need to rip, get under the thread with the tip of the seam ripper and then slide the stitch to the "U" shape of the seam ripper, which is the blade. This will "rip" your thread.

You can rip every few stitches on one side of your seam and then pull the thread on the back side and it all comes out in one tug. Some say this is the "correct" way to do it because you are less likely to tear your fabric.
Every few stitches ripped out.
Pulling the thread on the back side.
OR

You can open your seam and rip at the stitches between the fabric, but you risk ripping your fabric if you are too aggressive. Some might say this is the "wrong" way to rip out seams but I tend to rip this way more often because it goes faster. Sometimes this is the only way you can rip out the stitches because they are so small that you can't rip them out the other way.
The stitches between the fabric.
Ripping out stitches.

Do what works best for the seam you have to take out and just be careful.


TIP
Be careful to use the right stitch length (2.5 for a straight stitch) AND do not pull your fabric from the backside of the machine as you are sewing--this will give you uneven stitches! Uneven stitches aren't so pretty and are harder to rip out.

Tuesday, January 3, 2012

Just Pin It!

pins
Once upon a time I didn't like to pin my fabric together before sewing. Oh, I was such a novice sewer! I thought pinning was a waste of time. I also thought I was skilled enough to skip this unnecessary step. Well, I've certainly matured and don't believe either of those statements to be true any longer. Pinning is not a waste of time or an unnecessary step and everyone should pin regardless of their skill level!

In fact, pinning will save you lots of time. It's true! It takes less time to pin your fabric together than it does to rip out stitches from your unpinned fabric that shifted and has a bad seam. If pinning feels like no fun to you, then ripping out stitches is going to feel like zero fun!

So, when you do decide to pin, how should you do it? There are a few different ways to pin but I won't tell you which is the "correct" way because I don't think there is a correct way. I will tell you to pin the way that feels more natural to you and the way that you think will hold your fabric together best.

How To Pin
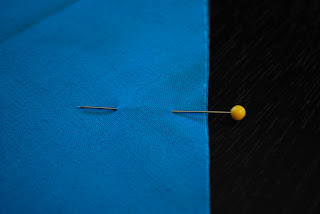
Pin perpendicular to the raw edge with the pin heads sticking out of the fabric--this is the way I pin most of the time. I've always done it this way and I like it because if I decide to sew on the other side of the fabric, all I have to do is flip over the fabric and the pins can stay. That can't be done if you pin parallel or with the pin heads on the fabric.
Perpendicular Pinning

Pin parallel to the raw edge. If you choose to pin this way make certain that the pin heads are on the bottom and the point is up. This makes it easier to pull out the pins while you're sewing. Sometimes I pin this way if my project needs to be secured in a way that perpendicular pinning won't secure very well.
Parallel Pinning

Pin perpendicular or parallel to the raw edge but in an inch or so in from the raw edge. Some of my Sewing 101 students pin this way and it can be a very practical way to pin if you don't want to stop to take out pins as you are sewing. This may not be the best way to pin every time you sew a seam but it can be helpful when sewing long, continuous seams.
Pinning away from the raw edge fo the fabric.

I've noticed that some of my students pin from left to right. I don't think I've ever pinned this way intentionally but I am assuming some people might do this because they are left-handed.
Pinning from left to right.

CAUTION
DO NOT SEW OVER PINS! Sewing over pins can damage your sewing machine, break your needle, or hurt you. I will admit that I will sew over a pin in certain unique situations but I do it slowly and cautiously. Otherwise, I pull out each pin before it reaches the presser foot.

TIP
I have a simple tip that will help you when you are pinning a hem, a pocket, an appliqué, or need to pin through only one layer of fabric. Place a quilting ruler between the layers of fabric that you want to keep separate and then pin. This will help you avoid pinning through to the other side and also gives you a hard surface under the fabric to help with pushing through the pin.
An example of pinning an appliqué to only one layer of fabric.
PIN SIZES
I have a favorite pin: the quilting pin. It is long (measures 1 3/4") and stays in place. In the photo below you can see two different-sized pins. The longer pin is the quilting pin. Since most of my sewing involves cotton fabric, I don't worry too much about the thickness of the pins I use. If you use lightweight fabric, you might want to consider using a thinner pin to avoid damaging your fabric.
General Purpose Pin - 1 1/4" and Quilting Pin - 1 3/4"

DID YOU KNOW
The tomato pincushion has a little strawberry attached to it for a special reason. The strawberry is filled with silica which helps to sharpen and clean your pins. 

If you want to make your own pincushion, find some fabric scraps and check out these cute tutorials:
-Pincushion Jar
-Stickin' it to the Pincushion
-Wild Flower Pincushion